Themes Marketplace
Choose and Apply a Theme in Storeino
Before customizing your store using the Customizer, you must first select a theme that suits your business needs. Themes define the overall look and feel of your store. Here’s a step-by-step guide:
Step 1: Access the Themes Page
- Navigate to the “Themes” section from the left-hand menu on your Storeino dashboard.
- Click on Store > Themes.
Step 2: Browse Available Themes
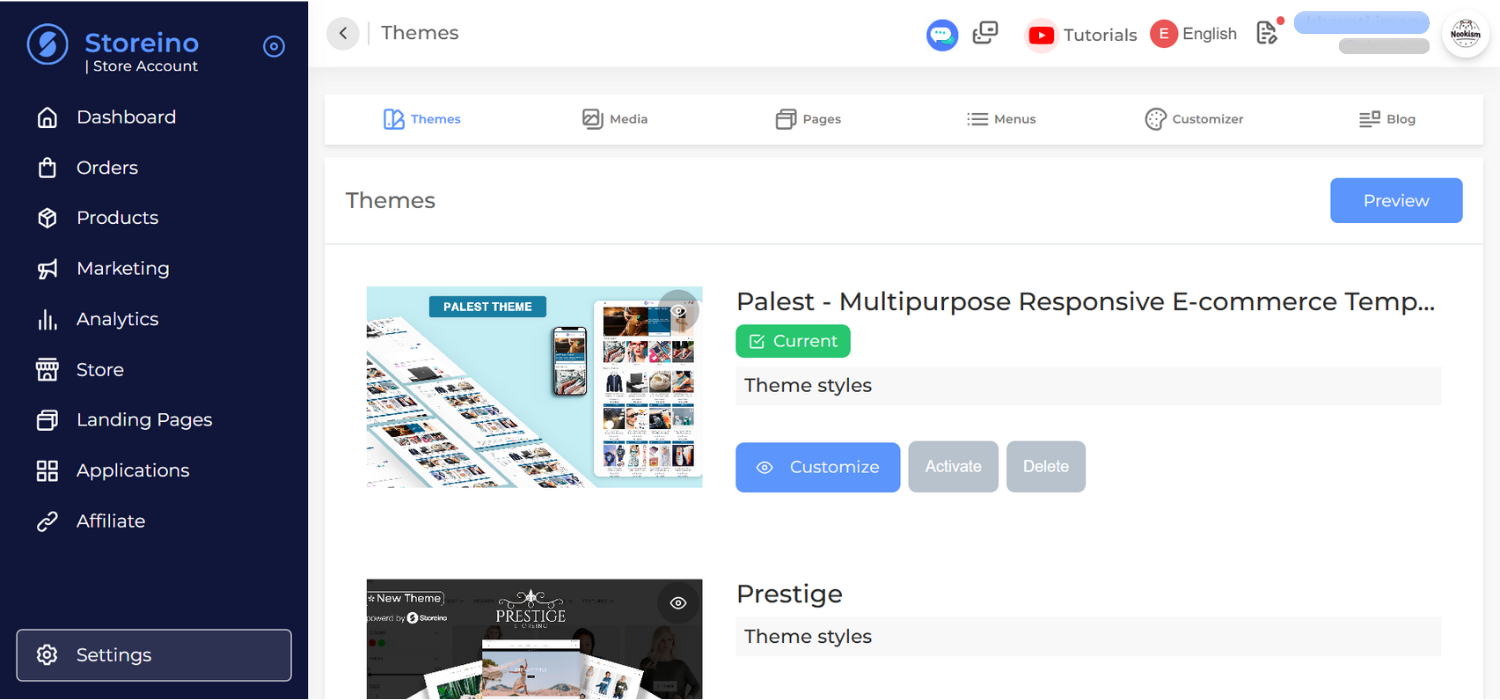
- The Themes page displays the currently active theme at the top and other available themes below.
- You can preview, activate, or delete themes from this section.
Step 3: Preview a Theme
- Click on the Preview button next to any theme to see how it will look when applied to your store.
- Review the layout, colors, and features offered by the theme.
Step 4: Activate a Theme
- To apply a theme, click the Activate button.
- The active theme will now display as Current with a green label.
- Once activated, the theme is applied to your store.
Step 5: Customize the Active Theme
- Click on the Customize button to open the Customizer for the active theme.
- Modify various elements such as the homepage, shop page, footer, and more to match your branding.
Important Notes
- Only one theme can be active at a time.
- You can switch back to a previously used theme without losing customizations.
- Some themes may have unique styles or layouts, so explore your options to find the best fit for your store.
Customize Your Homepage Using the Customizer
The homepage is the face of your store and can be fully personalized to match your brand. This guide walks you through customizing the homepage using the Customizer in Storeino.
Step 1: Access the Customizer
- Navigate to “Customizer” from the top menu bar on your Storeino dashboard.
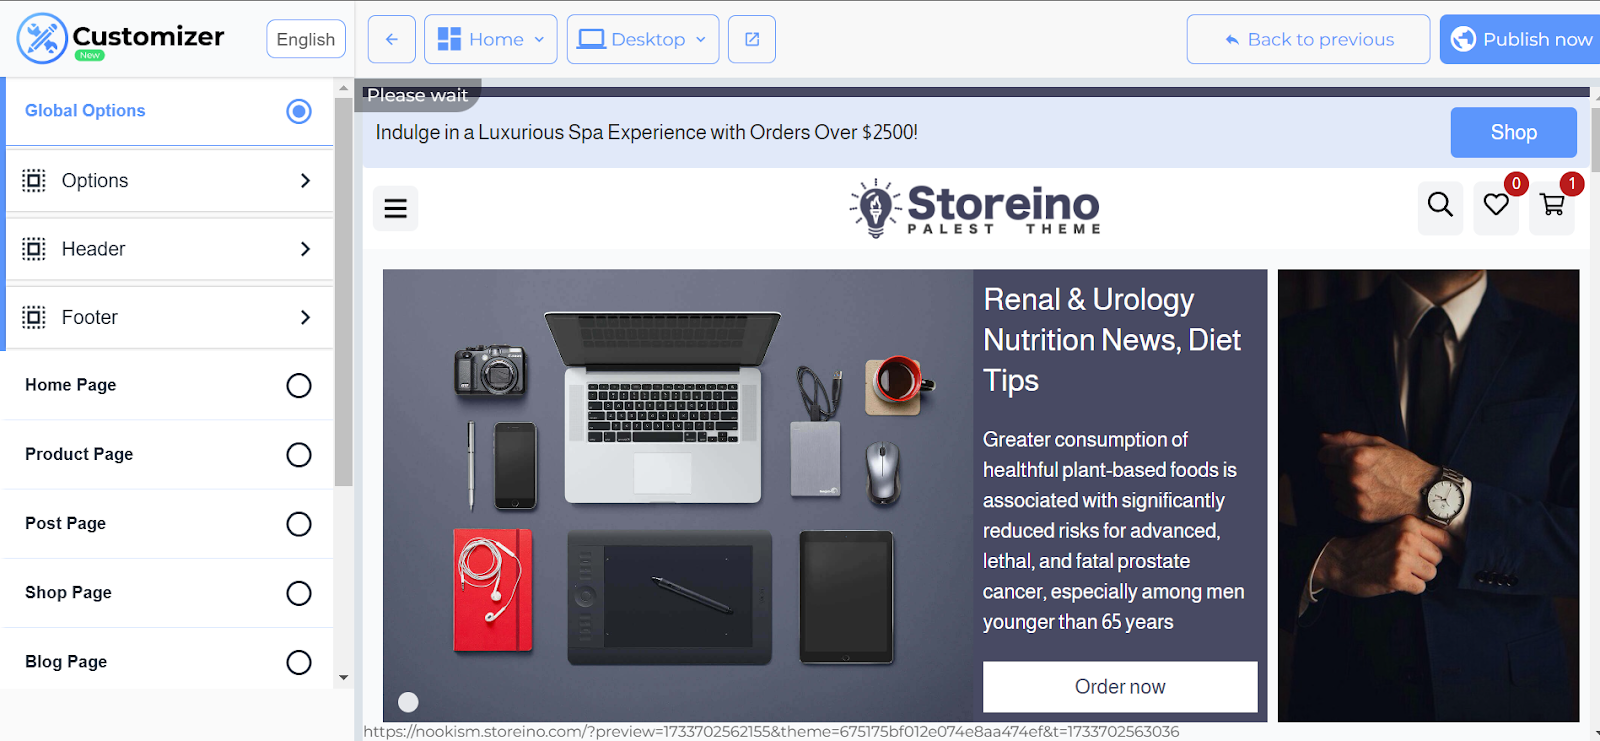
- The Customizer interface provides a live preview of your store on the right and a settings panel on the left.
Step 2: Understand the Layout
The homepage customization is divided into two main sections:
- Sections: Control visible parts of the homepage (e.g., header, slider, collections, etc.).
- Settings: Adjust global settings like typography, colors, and button text.
Step 3: Customize Sections
Each section is editable, and changes will instantly reflect in the preview.
- Header Top:
- Includes email, message, currency, language, and social media links.
- You can enable/disable components like email or languages and update their values.
- Add links to your social media accounts for platforms like Facebook, Twitter, LinkedIn, etc.
- Header:
- Customize the store logo, its height, and position (left, center, or right).
- Select the menu to be displayed in the header.
- Hero Section:
- Adjust components like collections, search bar, and contact information.
- Show/hide individual elements or rename them to match your store.
- Add placeholder text for the search bar and update contact details.
- Slider:
- Set the height for desktop, tablet, and mobile versions.
- Add slides with custom background images, text, button colors, and links.
- Choose animations (e.g., left-to-right, zoom in/out).
- Collection Carousel:
- Displays collections in a carousel format.
- Choose size:
- Small: Shows 4 collections per row.
- Medium: Shows 3 collections per row.
- Large: Shows 2 collections per row.
- Select which collections to display.
- Featured Products:
- Choose to display either the latest products or manually selected products.
- Adjust the size (small, medium, large) and the maximum number of products displayed.
- Blog Section:
- Show blog posts on the homepage.
- Select the type of posts (latest or manually chosen) and customize text, style, and the number of posts displayed.
- Brand Section:
- Showcase brand logos.
- Select all brands or specific ones to feature.
- Choose whether to display brand names below their logos.
Step 4: Customize Settings
- Typography:
- Select the fonts for your store, including title sizes and content size.
- Colors:
- Adjust the color palette to match your branding.
- General Settings:
- Update text for buttons like “Add to Cart,” “Buy Now,” and “View Details.”
- Configure wishlist settings and customer buttons.
Step 5: Preview and Publish
- Use the Preview toggle to view your changes across desktop, tablet, and mobile screens.
- Once satisfied, click Publish Now to save and apply your changes to the live store.
Tips
- Always click Publish Now after making significant changes to avoid losing them.
- Use the preview function to ensure your store looks great across all device types.